
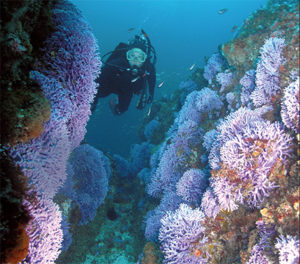
By Kim Sheckler • Photo by Dale Sheckler
Working with a photographer is one of the most challenging things I’ve ever done as a diver. I’ve been diving for 35+ years now, many of them as a photo subject for my husband Dale. Underwater modeling sounds like fun, and you might think it doesn’t involve anything more than swimming around and smiling, but I can tell you from decades of personal experience that working with an underwater photographer involves far more than smiling for the camera. In this article I’ll share suggestions that both the underwater photographer and his or her model will likely find useful.
Communication and Safety
As an underwater model a simpatico relationship with your buddy is a must, as you will be relying on nonverbal communications underwater. I’ll have to tell you lack of cooperation between the model and photographer buddy can really put a strain on a relationship, underwater or otherwise.
Safety is of course, as with any diving venture, of paramount importance – but even more so while diving as a model and photographer buddy team. It’s important that you agree on depth limitations, turn around air consumption time, etc. Do your pre-dive gear checks not only for safety of course but also being attentive to loose floppy ends of gear (straps, gauge consoles, safe seconds, straps, etc.) which can not only ruin photos but are part of common sense diving in kelp and will help preserve delicate reefs.
When diving together taking shots modeling around a particular subject be attentive to each other’s breathing gas consumption, depth and bottom time. Check more often than usual. You might be surprised that you both burn through more breathing gas while working to get good images. Be careful that you do not become so engrossed with your photographic goals that you lose track of critical dive data.
Go for the Goal
What is the goal of the dive? Shooting nudibranchs is much different than pictures of giant black sea bass. As a photo subject, having basic knowledge of underwater photography is helpful. Learn the various lenses your photographer dive buddy will be using, including how close you should ideally position yourself for a variety of shots.
Wide-angle is used for large or larger subjects such as schools of fish, big fish like big sheephead, giant black sea bass, sea lions, kelp forests and reef vistas. Macro is for close-up in tight and models are only occasionally used but can be especially effective you develop a dive plan in advance. Wide-angle photos and macro photos need a very different mindset, so know the goal and incorporate it into your dive plan.
The Plan
A good chunk of diving safety and a good buddy system is having and keeping a dive plan. This is even more important between you and your photographer buddy. Create a dive plan taking into consideration reef, kelp, depths, currents, entry and exits, etc. Carrying a camera in diving situations, especially a large rig, can be restrictive and you need have a plan and you need to be cooperative. Diving in surf, heavy seas, currents, and thick kelp can be challenging and you can be a big help. Plan your dive accordingly.
One thing that I have learned over the years is that communication is the most important thing you could ever do and the first place to start. Granted that is an important rule with any dive buddy, but if you don’t have a plan before the dive starts you will not have good photos at the end of the dive.
Beyond your normal diving hand signals, including a good knowledge of regular hand signals, agree on hand signals for posing. Your photographer buddy can be quite demanding (Dale) and an understanding of what is being communicating will keep the peace as well as make for better images. You and your photographer dive buddy should come up with and review hand signals for a variety of situations, including: move slowly across the field of view, go around, back away from the subject, or draw in closer. Plan to carry a dive slate with you. On it, write down a list of potential shooting/modeling scenarios that you can point to rather than having to try to communicate by signing.
Keep It Clean
Try to avoid getting the water column in front of the camera “dirty.” Cloudy water destroys clarity needed for superior pictures and particles can cause backscatter “snow” that detracts from a good photo. These days, post-dive edits using Photoshop or Lightroom or similar photo manipulation programs allow you to digitally “erase” backscatter and correct a wide range of “bloopers” but you’ll always be better off to minimize the potential for backscatter.
First and foremost an excellent underwater model must have expert buoyancy control. Your stillness or precise actions in the water column can mean everything.
Be aware of your body movements and what parts of your body are touching the sand. Even the California reef rocks are frequently covered in particulate matter that can easily be stirred up if you make an errant fin kick or wave of the arm. Your exhaled breath can cause silt and organic matter to “rain down” upon you, wrecking the scene. Where your bubbles are going can sometimes be just as important as where your feet are.
Be aware of the current. If a current is present, try approaching your target area or subject downcurrent. By doing so, any particles you stir up will drift away from you and out of the shot.
Thinking Like the Photographer
You need to think like the underwater photographer and frame the shot just as they would only in reverse. I have learned to look at the underwater world the way the photographer looks at it—so my perspective is flipped. How will the shot look, where will I pass be in the frame and where will the animal life be in the frame? What is the natural lighting and what will the background look like? If you look at the scene from the other perspective you will better set up the shot and know what to do and where to go.
Positioning Your Body